
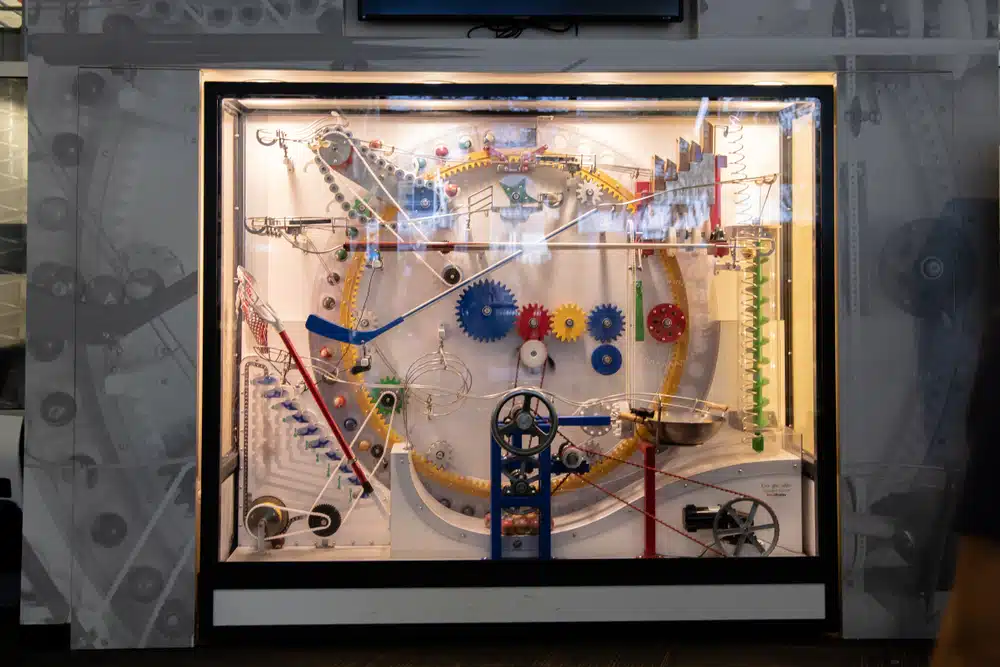
Imagine a contraption where a marble rolls down a ramp, hits a row of dominoes, which triggers a toy car to launch, and so on—all culminating in watering a plant or pouring a glass of water. That’s a classic Rube Goldberg machine: a purposefully over-engineered chain-reaction device designed to perform a very simple task in a comically complicated way. Each step (lever, ramp, pulley, etc.) triggers the next, until the final goal is reached.
Today, educators have adopted his idea to make science and engineering fun: by physically building these contraptions, you can see STEM concepts in action. In this blog, we’ll show how students from middle school to college use Rube Goldberg machines to learn STEM subjects in a hands-on way.
- What Is a Rube Goldberg Machine?
- How to Make a Rube Goldberg Machine
- Educational and Practical Applications of the Rube Goldberg Machine
- Frequently Asked Questions
- Takeaways
What Is a Rube Goldberg Machine?
The machine originates from Reuben “Rube” Goldberg (1883–1970), an American cartoonist and inventor.
Goldberg loved to lampoon our tendency to make things too complex, once calling such inventions “a symbol of man’s capacity for exerting maximum effort to accomplish minimal results.” In his original cartoons, he sketched wild machines (like a self-operating napkin contraption) that do mundane chores via long trains of motion.
Here’s an example of a Rube Goldberg Machine. A student drops a marble into a paper-towel tube. The marble slides out, knocking over dominoes. The last one hits a toy car, which flips a switch activating a small fan. The fan blows a sailboat toy across a water tray, scooping up a toy fish. This elaborate sequence achieves a simple task (catching the fish) in a delightfully roundabout manner.
Each step uses everyday objects or basic mechanical principles, making it fun and inventive. In short, Rube Goldberg machines are entertaining puzzles of physics and engineering, used for amusement and increasingly for education.
How does a Rube Goldberg machine work?
A Rube Goldberg machine may seem chaotic, but it’s built from simple machines like levers, pulleys, inclined planes, and wheels, each triggering the next action. In fact, Rube Goldberg machines used in educational settings rely on simple components:
- Simple machines. Levers, pulleys, wheels/axles, ramps (inclined planes), wedges, screws and gears—these provide the basic motions.
- Everyday objects. Marbles, dominoes, toy cars, plastic cups, cardboard tubes, books and blocks, string, tape, funnels, spoons, etc. (Teachers often challenge students to use recycled materials.)
- Creative props. Musical toys, lights, animals or action figures, cameras—anything that adds fun or sound.

Shawn Jordan, an engineering professor from Arizona State University, notes that a well-built Rube Goldberg machine encourages you “to be creative and think more holistically” by adding visuals, music, or playful themes. In short, when designing a Rube Goldberg machine, you get to mix science with art: think combining pulleys and levers with music and color. The sky’s the limit on creativity—except that your machine still has to work!
How to Make a Rube Goldberg Machine
Designing a Rube Goldberg machine is really a mini engineering challenge. Here are the steps on how to make your own:
1. Define your goal and scope.
Start by deciding the simple task your machine should accomplish, like turning on a light or popping a balloon. Determine the scale (table-sized or classroom-spanning) and any restrictions, such as time or materials.
At this stage, you should also clarify the exact simple task and any rules. Think size limits, time constraints, and safety. Decide who the machine is for. Classroom demo? A science fair?
2. Brainstorm and plan.
Work with your team to brainstorm actions for each step. Draw sketches or flowcharts to visualize how one action leads to the next. Planning early helps prevent wasted time later.
As a team, list many ways to link steps together. Think of different “transfer” ideas (gravity, spring, magnet, motor, etc.). Draw a concept design with all parts in sequence. Include dimensions and connections.
3. Gather materials and conduct experiments.
Collect your found objects (cardboard, toys, etc.) and simple machines. Start assembling according to your plan. In school, you’ll likely need at least 3–4 simple machines in the final device.
Work systematically: test each sub-step (e.g. “step A triggers B”) before attaching it to the next. Frequently test and adjust during building. Use tape, glue, clamps or even books to stabilize parts.
4. Embrace trial-and-error.
After initial assembly, run the whole machine multiple times. Of course, something might fail or go off-course. Note which steps worked and which didn’t. Adjust angles, weights, spacing, or even redesign a section.
It’s best to redraw if the design doesn’t work, so you might revise your drawing after some testing. Keep tweaking until the entire sequence (from start to finish) works smoothly.
For example, if your marble’s track is a bit crooked and it misses the target, you’ll learn about fine alignment. If a lever’s fulcrum is too weak, you’ll explore material strength.
This hands-on trial-and-error teaches the engineering mindset, which is helpful especially if you’re currently pursuing an engineering course or planning to take one in college.
5. Add creative touches.
If you can add a music note or a funny prop (like a toy dinosaur on a lever), do it! The “flip side” of the technical challenge is encouraging creative touches: visuals, sounds, themes or humor. Just keep in mind the basic goal: no matter how wild the machine looks, at the end it must complete the simple task.
Educational and Practical Applications of the Rube Goldberg Machine
Building a Rube Goldberg machine is a hands-on STEM lesson that introduces students to physics, engineering, and problem-solving. By linking many parts together, you’ll explore simple yet creative solutions to achieve a goal. If you’re looking for simple Rube Goldberg machine ideas for school, the examples below can serve as fun and educational projects, perfect for classroom activities.

Teaching STEM concepts
In a classroom activity, students might be tasked with designing a Rube Goldberg machine that pops a balloon or rings a bell using six or more steps. As they build, they begin to see how abstract physics concepts play out in real time:
- Energy conversion in action. For example, a marble released from the top of a ramp converts its stored (potential) energy into motion (kinetic energy), then knocks over a series of dominoes. One step might trigger a pendulum, turning motion into sound by striking a bell.
- Forces and motion. Students quickly see how gravity accelerates movement down ramps, and how friction—like a rubber surface slowing a rolling toy car—can either help or hinder the machine’s success.
- Understanding systems and sequences. Because one failed step can break the entire chain, students learn the importance of cause and effect, timing, and precise alignment. Adjustments and retries are part of the learning process.
Through trial, error, and teamwork, students are developing a practical understanding of energy, force, and system design while also practicing problem-solving and collaboration.
This project also emphasizes the engineering design process. Students start by defining the project’s requirements—such as determining that their machine should perform a specific task, like turning on a light switch or pouring water. They brainstorm ideas, sketch their designs, and create prototypes for each step.
Each prototype is tested, and if it fails, students adjust and refine their designs. This iterative process mirrors how real engineers solve problems and emphasizes the importance of systems thinking, ensuring all parts work together as a cohesive whole.
Teamwork and communication
Building a Rube Goldberg machine highlights the importance of teamwork and communication, as no single student can complete the entire machine alone. As they collaborate, students must assign roles, share ideas, and coordinate timing to ensure everything works in sequence. The experience naturally builds skills in coordination and collective problem-solving.
When a step doesn’t work as planned, students analyze why it failed and experiment with new approaches. This kind of creative problem-solving encourages critical thinking and innovation as they refine their designs.
The process also teaches persistence. Building a Rube Goldberg machine requires constant adjustments and small fixes. Through trial and error, students learn to stay focused and flexible, improving the machine step by step until it runs smoothly.
Competitions
Many schools also incorporate Rube Goldberg machines into yearly competitions, where students can showcase their creativity and engineering skills. These projects make excellent science fair projects, capturing the attention of teachers and judges alike.
One of the oldest and most prominent is the Rube Goldberg Machine Contest, which started at Purdue University in 1987. In this annual competition, collegiate teams design and build complex contraptions to perform a simple task. Teams are judged on the engineering and entertainment value of their machines.
Here are other notable Rube Goldberg machine competitions:
- Carnegie Science Center’s Chain Reaction Contraption Contest. High school teams build a 20-step machine to complete a set task.
- Science Olympiad’s Mission Possible. An event that challenges students with Rube Goldberg-like tasks.
These competitions celebrate both creativity and engineering, resulting in inventive, amusing machines. For example, one team built “The Meme Machine,” a multi-month project transported and reassembled at the contest. Another team from Quest Academy entered a space-themed machine while dressed as astronauts.
Many competitions now link to national contests, offering winners the chance to advance and receive scholarships or tech program prizes.
Student-made machines often go viral online, offering inspiration for others. One example is the “Monster Trap”, created by a 7-year-old student, showing that even kids can tackle these projects. Watching these videos can help students understand what chain reactions work, how many steps to include, and how to make their machines visually engaging.
The Rube Goldberg Institute offers teaching resources and videos of past contests. It’s a great place to find inspiration for your own project, and you can see how intricate and innovative past winners’ machines are.

Frequently Asked Questions
1. What are some simple Rube Goldberg machine ideas for school?
If you’re starting out, simple tasks make great Rube Goldberg projects. You could build a cereal flosser that dispenses floss when a cereal box is opened, a light switch machine that turns off a lamp, a recycling device that drops a bottle into a bin, or a guinea pig feeder that releases food after a chain reaction. These ideas are easy to follow and highlight basic cause-and-effect design.
2. Why is it called a Rube Goldberg machine?
A Rube Goldberg machine is named after Rube Goldberg, an American cartoonist, engineer, and inventor known for his humorous illustrations of overly complex, absurd machines designed to perform simple tasks in convoluted ways.
3. How can Rube Goldberg machines be used in education?
Rube Goldberg machines are effective tools for teaching STEM concepts through hands-on learning. They help students grasp principles like energy transfer, mechanical advantage, and problem-solving while promoting creativity, collaboration, and the engineering design process.
Takeaways
- Rube Goldberg machines are an excellent way to demonstrate key skills that colleges value, such as creativity, problem-solving, and collaboration.
- By building these intricate contraptions, you gain hands-on experience with engineering principles and develop a mindset that’s essential in today’s fast-evolving fields: innovation and persistence.
- At AdmissionSight, we specialize in personalized and expert guidance to help you maximize the impact of your application. Our private consulting program ensures that your unique experiences, like working on a Rube Goldberg machine, are presented in the most compelling way possible.